Week #49 – Maggie Austin Ruffles
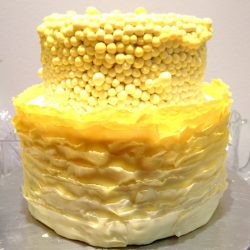
The wonderfully talented Maggie Austin has generously shared her secret to beautiful ruffled cakes in her Craftsy class. The technique is shockingly easy and has fast become my favorite new cake decorating technique.  I won’t give away her secret here but I will show you the result.

maggie1 maggie2

This was actually my second attempt at the ruffles. My first was this little yellow number.

maggie5

I loved the yellow but not a big fan of the pearls on top.  They were a bit too heavy for the delicate ruffles.  I also liked the bigger ruffles.  I thought they looked a little more modern.maggie3

The most time consuming part is actually preparing the fondant.  Make a gradation is hard work and tough on your hands because it requires a ton of kneading the fondant.  But the result is really lovely.maggie4

I cut out each of those blossoms to go on top and thinned them out to look a little more realistic.  Then I dusted them with a little pink luster dust to give it a little more interest.

This cake was made of styrofoam so while technically not a cake and not edible, it was still quite time consuming so I’m going to call it a cake.  I wanted to have a few dummy cakes to put on display in my house so this is one of them.  I think in the future it would make a lovely wedding cake for someone.


Week #34 – Gluten Free Birthday Cake

My friend Nicky can’t eat wheat.  It kind of puts a damper on making her a birthday cake.  After my previous attempt at making a gluten free cake from scratch, I decided to go with a mix and doctor it a bit.  She wanted a chocolate cake so I added chocolate and cocoa powder to the mix to give it a nice, milk chocolate flavor.

I made the flowers about a week in advance.  This made assembly much easier.  It was more like a fun arts and crafts project because I didn’t have to worry about making the flowers right before putting them on the cake. Also it gave the flowers time to firm up.  They are made from gumpaste which gets pretty hard after 10-24 hours.  I also filled in some of the gaps with silver and white dragées (balls of sugar).  I finished it off with a royal icing trail of pearls around the cake.

I also decided to make a custom board for this cake.  Unfortunately I only had one the same size as the cake so it’s a bit hard to see.  But I trimmed it with lace to go with the girly, romantic theme of the cake.

The cake was made with gluten free mix and vanilla buttercream, dyed turquoise.  I’m so in love with the cake.  This is definitely one I’d do again.  The flowers were fairly quickly to make and they really make a big impact. I think it would be perfect for a wedding or a shower cake.

Week #16 – Poppies in a Box

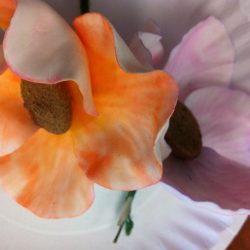
I attended a wonderful poppy making class at Sugar Flower Cake Shop last weekend and we made these adorable poppy flowers sitting in a “wooden” box. The cake was a vanilla butter cake with salted caramel buttercream on the inside and vanilla buttercream on the outside. The “wood” is made from gumpaste mixed with a softener so it won’t get too hard. You make a woodgrain effect by mixing several shades of brown together until they swirl but don’t mix completely. Then I accented the wood with some “screws” that held the box together which is just brown edible paint.

It was a lot of fun to make this cake.  Sugar Flower Cake shop does a lot of the hard work for you and all you have to do is the fun assembly of the cake – which I like. Poppies are a relatively easy flower to make since they don’t have too many petals or complicated assembly.  Plus they’re just adorable.

Next time I think I’ll air brush the color onto the poppies so I can get nice bright colors. The center is made from gumpaste dipped in nutmeg so it smells amazing!

Since I’ve gone gluten free, I didn’t get a chance to try the cake but my teammates at the International Space Apps Challenge did and I think they enjoyed it. Also I had to shoot the pictures with my iphone since I didn’t go home before my teammates devoured the cake.

Week #4 – Lettering is hard

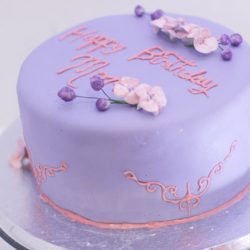
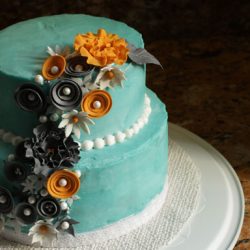
I was asked by my fabulous doctor to make a cake for her mom’s birthday.  She wanted purple fondant with pink lettering.  She also wanted some flowers and a space to put a silver candelabra candle holder she had found.  The candelabra had a swirl pattern in it that I decided to mimic on the side of the cake.

The one thing she did ask for? “Happy Birthday Mom” written on the cake.

Writing in royal icing is probably one of the hardest things for me.  I can’t ever get it right. The technique often involves printing out what you want to write on a piece of paper and then tracing over it on the cake so it leaves an indent in the fondant.  After that you write over the indent with royal icing with a very fine tip or a cornets (core-neys). Anyway I’m not 100% happy with how it turned out but I will definitely put this on my list of things to learn to do better.

I used a similar technique on the side of the cake.  I have an impression press from wilton that puts the indent of the swirl in the fondant and then I went over it with royal icing.  I really like how this turned out.

I also made all the flowers with white gumpaste and painted them with a mix of food coloring, luster dust and alcohol.  The small balls are called mimosa and they are balls of white gumpaste rolled in purple sanding sugar.

The cake is vanilla butter cake with vanilla icing.  There’s a small bit of amaretto and simple syrup on each layer of cake.

Photos taken by my amazing husband, Geoff Lerer

Week #2 – Faux Bois

Ever since I worked at The Chopping Block, I’ve become obsessed with faux wood grain.  I’ve always wanted to make a cake that looked like chopped wood.

This cake is actually a 9 inch styrofoam dummy, a 6 inch vanilla and vanilla buttercream cake and another 3 inch dummy all covered in fondant.

I used to have one of these great impression mats that had the faux bois in it.  You roll out the fondant on the impression mat and then put it on the cake.  Well, I lost it.  It’s clear plastic and very easy to lose.  So I decided to hand draw the pattern on the cake.

My first attempt I used a tool that looks like a spear so the edges were a bit rough.  But the other 2 tiers I used a mini rolling tool that looks like a tiny pizza cutter and the results were far smoother.  I also carved hearts into the “wood” for an extra bit of charm.

I finished the cake off with hand-made red flowers, gum paste buttons and a band of royal icing around each tier.  Then I found these adorable deer and decided they would be the perfect adornment to this adorable woodland cake.

Week #1 – Mom’s Birthday Cake

The first cake in my 52 cakes!

Today is my mom’s 65th birthday! In order to celebrate her birthday I wanted to make her a fabulous cake.  This cake is vanilla cake brushed with kalua and vanilla Italian buttercream.  It’s covered with purple fondant and adorned with sugar flowers and a gumpaste bow.

I traveled to DC with the cake in a cardboard box and it arrived in tact!  Score one for my packing abilities. Should have taken a picture of the packing. It was almost a pretty as the cake!

We didn’t eat the cake while I was down there so we’ll have to wait to hear from my folks when they slice it open.